
Steps, Actors & Branches
The process behind a solution: what happens in what order, who performs each step, and what runs side by side
Steps and Sub-Steps
An open solution reads left to right as numbered step cards, each arrow leading into the next. A step can have sub-steps beneath it — 2.1, 2.2 and so on — at any depth.
Adding and ordering
- An empty solution shows Add the first step. After that, hover a step and use its + to the right to add the next step, or the + beneath it to add a sub-step
- Drag a step card to reorder it, or drop it on another step to nest it there
- Deleting a step deletes its sub-steps with it; the announcement counts them and an Undo button brings the step back
What a step card shows
- Its position, its name and its
ST…ID badge - A row of small field indicators — description, inputs, actions, outputs, conditions, linked solution — lit where the field is filled in. Hover one to read it
- A fork chip when the step splits into branches (see below)
- Hover controls: view, edit, delete. The eye opens a read-only panel of the whole step, with an Edit button that leads to the form
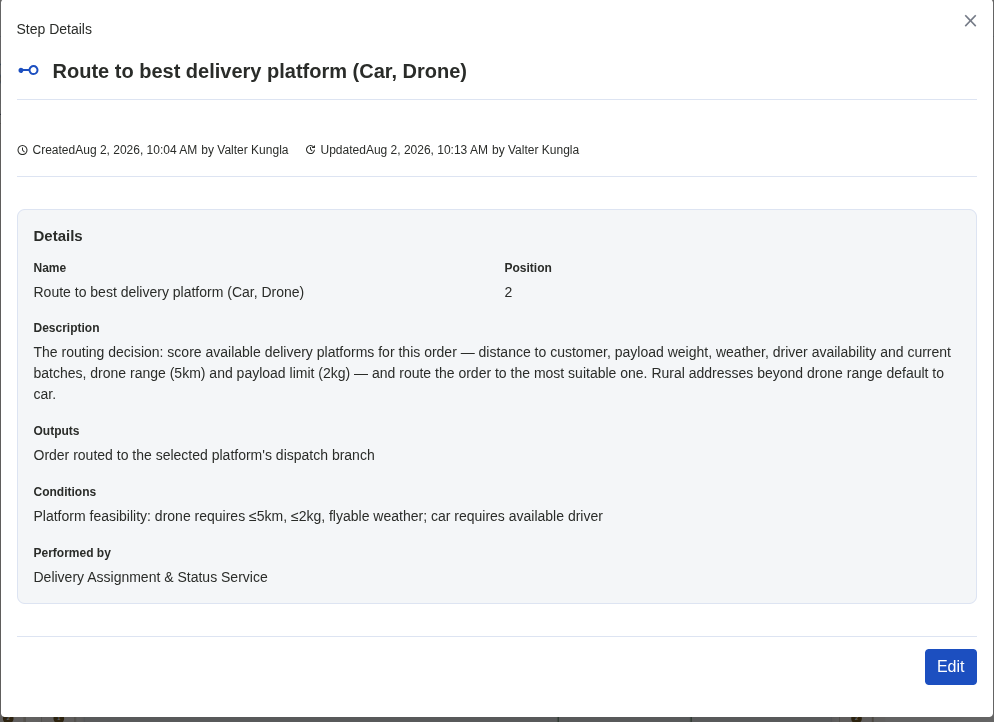
The read-only step panel: the full process detail, without leaving the board. (Click to zoom)
A step's form carries the full process detail — description, inputs, actions, outputs and conditions — plus the three choices that place it in the section: who performs it, which step it sits under and on which branch, and which solution it hands work to (see Solutions).
People and Systems: The Actor Rows
Down the left of the section runs an actor column: the people at the top, then one row for each system or tool that performs steps on its own. A step sits in its performer's row, so the process reads left to right as a sequence and top to bottom as a cast.
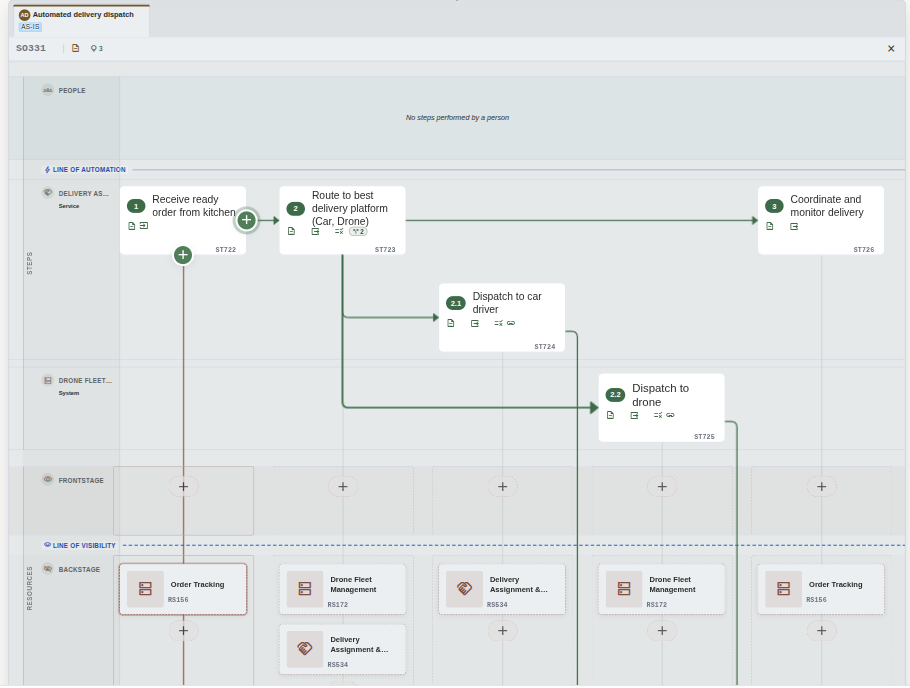
A fully automated solution: nobody in the People row, two systems each with a row of their own, and a step that splits into two branches — one of them crossing into the other system's row. (Click to zoom)
The People row
The top row, People, holds every step a person performs. It does not name who they are; the segments linked to the job say that. When no step needs a person it says so: "No steps performed by a person." Every step starts here. Move it out by choosing a system or tool under Performed by in the step's form; that performer gets a row of its own below the line of automation, titled with the resource's name and type.
Two lines, two different questions
The section has two horizontal lines that measure different things:
- The line of automation answers who acts. Above it, people. Below it, systems and tools working with nobody attending them.
- The line of visibility, further down, answers whether the customer sees it. Frontstage above, Backstage below — see Staging & Attachments.
They are independent: a backstage step can be done by a person, and a frontstage step the customer watches can be fully automated. A step's row says who performs it; the lane its resources sit in says who can see it.
Marking a step as performed by a system
- Open the step's form from its card, or from the keyboard outline
- Under Performed by, choose A person or A system or tool
- "A system or tool" opens the resource tree in place; pick the one that does the work
- Save, and the step moves into that resource's row. Pick the same resource for another step and the two share one row
- Switch back to "A person" to return the step to the People row
Use it for work that runs with nobody attending it — a scheduled job, an integration, a bot, an unattended machine. A step a person performs using a tool stays a person's step; the tool belongs in a staging lane.
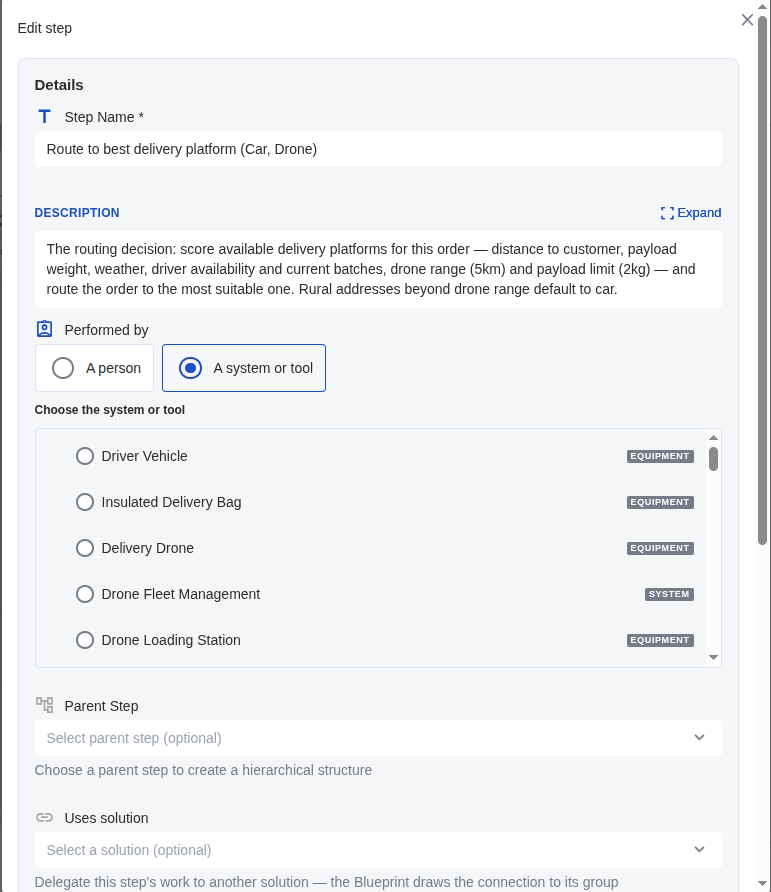
The choice sits in the step form, with the resource tree opening in place once you pick "A system or tool". (Click to zoom)
Work That Runs Side by Side: Branches
Under one step, two things may start at once — the warehouse picks the order while the customer gets their confirmation — or three sub-steps may be one run, done in order. Branches say which you mean.
Sub-steps on the same branch run one after another. Sub-steps on different branches run at the same time. This applies under any step, at any depth.
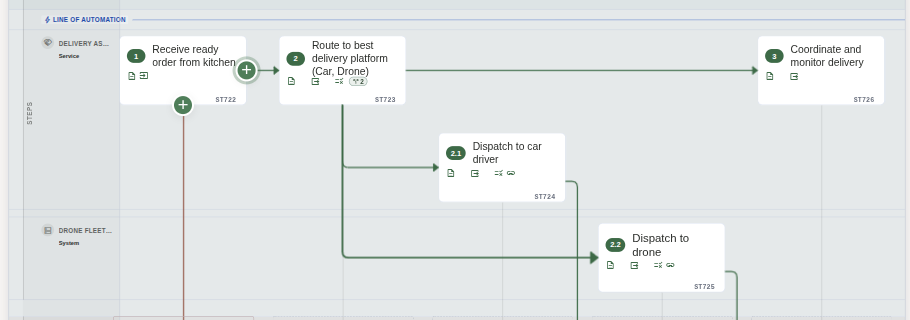
Step 2 splits into two branches: 2.1 and 2.2 run at the same time, and 2.2 happens to be performed by a different system, so its line crosses into that system's row. (Click to zoom)
How a branch reads on the canvas
- One branch is one chained run: its steps sit side by side on a single line, each arrow leading into the next
- Separate branches are stacked, each starting its own line from the parent step, the first branch nearest the parent
- A step that splits carries a chip — a small fork glyph and a number on the parent's card — only when there are two or more branches under it. Hover it to read "Splits into 3 branches"
- Branch numbers are positions, not names: the first, second and third branch under that step, counted as drawn. Move one and the numbers follow
A sub-step added with the "+" on a step card starts on a branch of its own, so a board built before branches existed looks exactly as it did until someone puts two sub-steps on the same branch.
A branch, a row and a lane answer different questions
- The branch says whether this runs alongside something else, or after it.
- The actor row says who performs it — a person, or a system working on its own.
- The staging lane says whether the customer can see it.
They combine freely: one branch can run across the cast, a person starting it and a system finishing it, with the arrow that crosses between their rows as the handover.
Putting a step on a branch by dragging
- Pick up the step card. Its actor row is drawn around it while you hold it, with the branches inside marked out and the one you are about to land in filled in
- Drop it on another branch's line to join that branch, in the place you dropped it
- Drop it on the middle of the step it hangs off to start a new branch under it. Dropping onto any card means "become a sub-step of this one, on a branch of its own"
- The dragged step's own sub-steps fade and their lines are hidden until you drop
A drag stays inside the step's own actor row, so it never quietly changes who does it; a card refusing to leave its row isn't stuck. To move a step onto a branch performed by someone else, use the step's form or the keyboard outline below.
Choosing a branch in the step's form
- Open the step's form from its card, or from the keyboard outline
- Under Parent step sits Branch. It lists every branch under that parent by position and the name of the step that starts it — "Branch 2 — Notify the customer" — with New branch at the end
- New branch is absent when it would change nothing: a step alone on the last branch is already a branch of its own
- Save, and the step moves. This route has no row limit, so it can put a step on a branch performed by a different person or system
Change the parent and the branch empties and asks again before saving: branches belong to the step above them, so "the second branch" under the old parent means nothing under the new one.
Branches from the keyboard
Everything above is available without a pointer, in the canvas's keyboard outline:
- Every step states its branch as it is read — "Branch 2 of 3" — but only where its parent actually splits
- "Move step … to another branch…" lists the branches under that step's parent, with the current one marked, plus New branch. Unlike the drag, it can move a step to a branch in any actor row
- "Move the whole branch earlier / later" sits on the first step of a branch with more than one step, and moves every step in it up or down past its neighbour
- For a step alone on its branch, plain move earlier / later swaps places with the branch beside it
- Each announces which branch the step is on now, and of how many
Mapping a Job End to End
- Add the job in the Jobs band and wire it to the segment that needs it done
- Click the job card to open its Solutions section, and use the "Add solution" tab for each competing approach
- Add the first step, then the next steps along the row; nest sub-steps under the step they belong to
- Where the work splits, put the sub-steps that run together on one branch and the ones that run alongside on branches of their own — by dragging, or from the step's form
- In a step's form, mark the ones that run without a person under "Performed by" — each system gets its own row in the actor column
- Click the "+" in a Frontstage or Backstage slot to stage the resources behind each step
- Changes save automatically as you go