
The Canvas Area: Whiteboards, Prototypes and Scenes
Keep the work behind each solution right next to it. Sketch the flow on a whiteboard, click through a working prototype, run a scene, and give each one a link your team can open directly.
One Box for Every Piece of Work
The Canvas band at the foot of the Blueprint holds a box for each whiteboard, prototype and scene in your workspace. A solid line runs from the top of a box to every solution it is linked to. When several boxes belong to the same solution they share one line, which splits into a branch for each box, and the lines route around the boxes above instead of crossing them. At a glance you can see which sketch explains a solution and which prototype tries it out. A box that isn't linked to anything is always shown. A linked box is shown while at least one of its solutions is on the Blueprint, and it steps aside when you hide or filter those solutions away.
| Kind | What it is | Opening it shows | Its address |
|---|---|---|---|
| draw Whiteboard | A free drawing board for your team, added with Add whiteboard | The whiteboard editor | /app/blueprint/whiteboard/<id> |
| web Prototype | A clickable prototype built for this workspace | A live, sandboxed preview | /app/blueprint/prototype/<id> |
| science Scene | A simulation built for this workspace | A live, sandboxed preview | /app/blueprint/scene/<id> |
Each box shows its kind, its name and its ID, with a copy button like every other card on the Blueprint: SH108 for a whiteboard, D21 for a prototype or a scene. Prototypes and scenes also show when they were last updated. Once something is drawn on a whiteboard, its box shows a small preview of the shapes (outlines and colours, no text) instead of the icon, and the preview catches up a moment after anyone edits it. Search the Blueprint for a box's ID or name to jump to it; if the box is linked, the solution it belongs to opens on the way so the box comes into view. A box that isn't linked yet has a dashed border and says Not linked. An empty area says No work yet and offers Add whiteboard.
Linking and Arranging Boxes
Link by dragging
Every box has a small connect handle. Drag it onto an open solution, or onto a solution in the Solutions band. Solutions you can drop on light up as you pass over them; let go to link the box and draw its line. Dropping on empty space, or pressing Esc, cancels. If the box is already linked to that solution, nothing changes and you're told so.
Link from the menu
Open a box's menu with its ⋯ button or a right-click. It starts with Open and Go to a linked solution, then a one-click link to the open solution (when the box isn't linked to it yet) and Link to solution… for picking several at once. Unlink removes a single link. Linking or unlinking one solution can be undone from the notification that follows; a change to several solutions in the picker can't be undone in one step.
Go to a linked solution
Go to opens the linked solution on the Blueprint and brings it into view. Hovering a box highlights its lines, and an open solution marks the boxes linked to it.
Move boxes
New boxes line up in a tidy grid: whiteboards first, then prototypes, then scenes. Drag a box anywhere in the area and its place is saved for everyone. Press Ctrl+Z straight away to put the last move back.
Build a Prototype or Scene with AI
When the in-app assistant is turned on for your workspace, the Canvas band offers two extra buttons, Add prototype and Add 3D scene, each marked with a sparkle. Hover one or move keyboard focus onto it and a ring in the assistant's colours circles its border. Press it and a draft box appears in the Canvas band, with no dialog in the way. Describe what you have in mind, press Start, and the assistant plans it with you and builds it. The new box then appears in the Canvas band.
Who sees the buttons
You see them only when the AI assistant is enabled for the workspace and your role lets you edit whiteboards, prototypes and scenes. They are hidden for view-only members and on phones, and a draft you saved earlier is hidden too, not deleted. Screen-reader and keyboard users get the same two actions in the Canvas work list.
The draft box
The draft is a box in a strip above the Whiteboard, Prototype and Scene boxes, and it moves and zooms with the canvas. There is one draft per kind. Pressing the button again jumps back to it: the canvas zooms in to a readable level, the box flashes and the first field is focused. A button reading continue draft means one is waiting.
Two fields
How do you envision this prototype? (or scene) is required: describe the idea in your own words. What should it include? is optional, and you can name jobs, solutions or resources in it. The assistant looks them up in your Blueprint, so nothing is picked or linked for you in advance.
Keep it and come back
Your draft is saved in this browser for this workspace and your user, so you can look around the Blueprint, copy what you need and return later. It is cleared when you log out. Esc leaves the field and keeps the draft. Discard removes it, and asks first if it has text.
Plan first, then build
Start (or Ctrl+Enter, Cmd+Enter on a Mac) opens the chat on a fresh conversation and sends your request, and the draft is cleared. The assistant replies with a short plan and builds only after you approve it in the chat. Start is unavailable while the assistant is still answering or a previous request is still being handed over: wait a moment, then press it again. If the assistant can't be reached, your request is placed in the chat message box with a notice so you can send it yourself.
Plan limits and AI quota
Prototypes and scenes count against your plan (the Free plan allows 3 of each), and AI use has its own quota. When either limit is reached, the assistant tells you in the chat instead of building.
Every Object Has Its Own Address
Click a box (or choose Open from its menu) and it opens over the canvas, while the address bar changes to that object's own URL, such as /app/blueprint/prototype/21. Bookmark it, paste it into a ticket, or send it to a teammate: anyone in the workspace who opens it lands straight on that object.
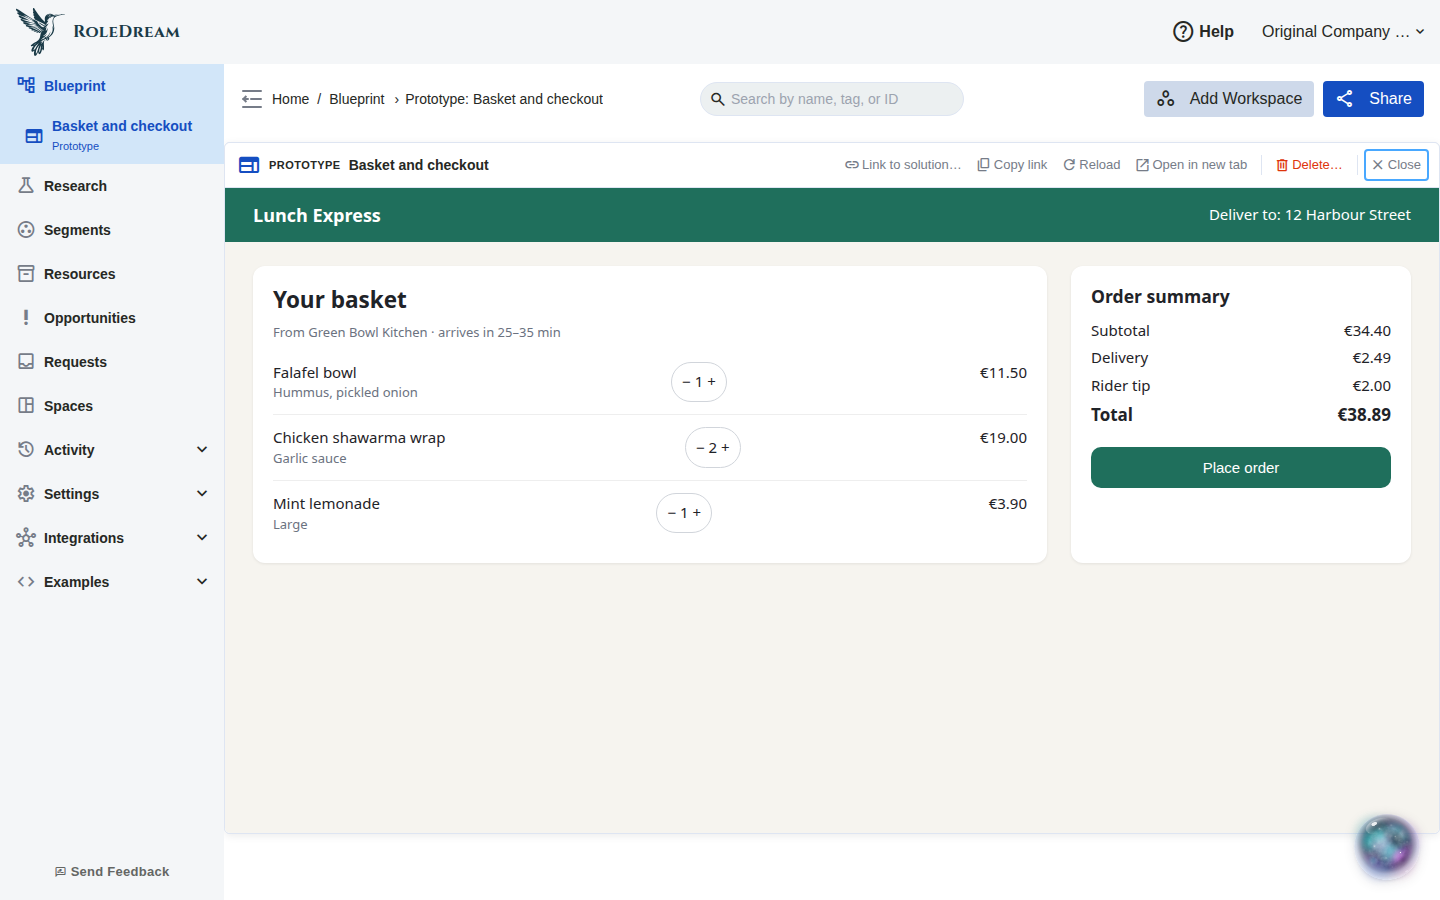
A prototype open at its own address: its name appears under Blueprint in the navigation and in the breadcrumb. (Click to zoom)
Back, Forward and reload
Opening an object adds a step to your browser history, so the browser's Back closes it and Forward opens it again. Reloading the page reopens the same object. Closing it with Esc or Close returns you to the canvas exactly where you were, even when you arrived from a link, so closing never takes you out of RoleDream. Only one object is open at a time. Switching to another whiteboard from inside the editor replaces the address rather than adding a step, so Back still means "close".
In the navigation
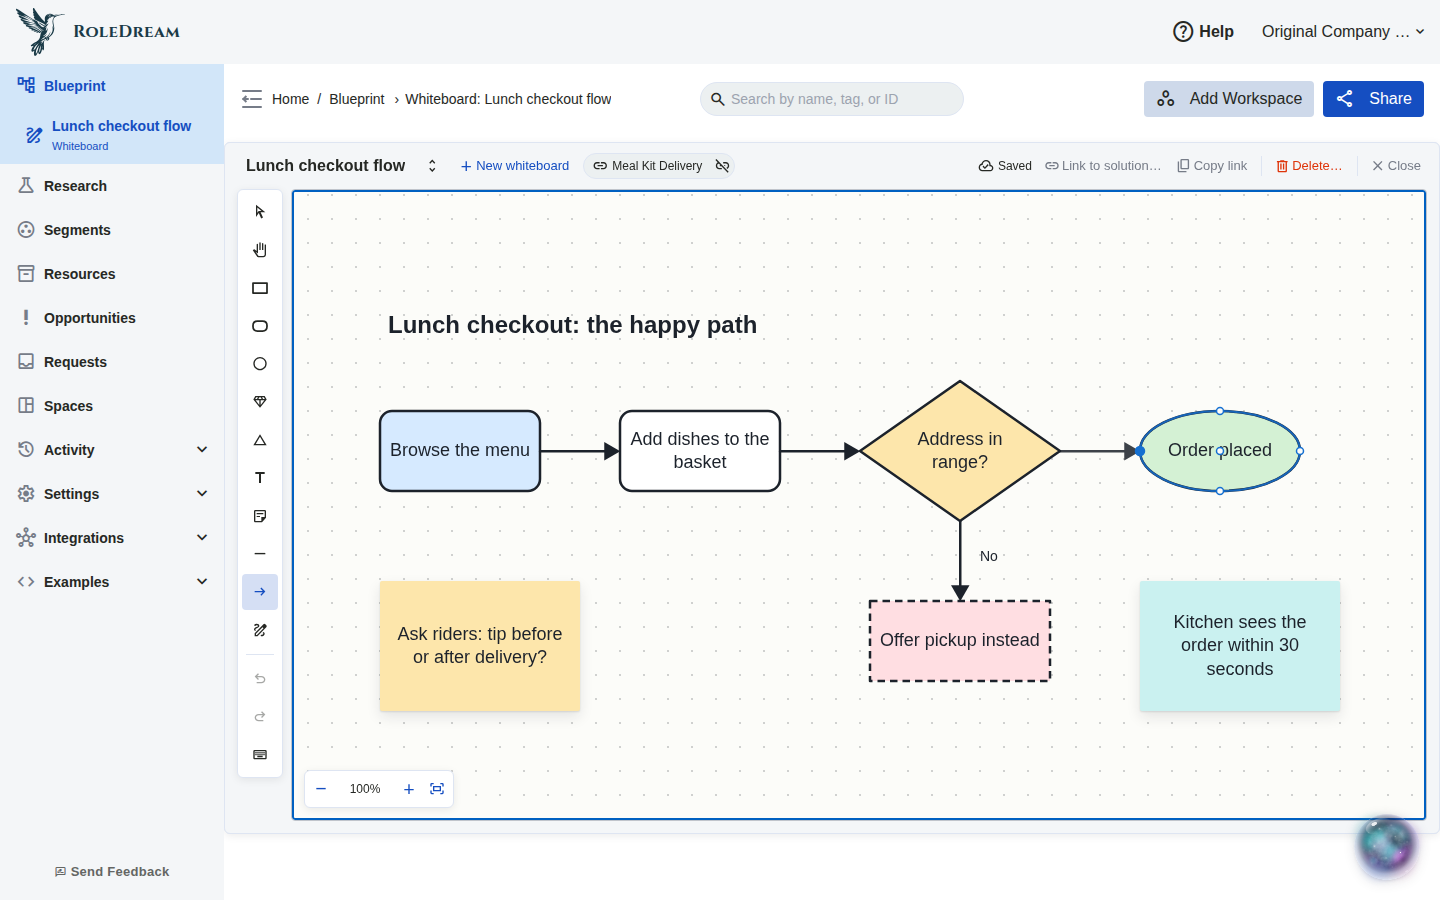
While an object is open, its name appears under Blueprint in the left navigation, labelled with its kind (Whiteboard, Prototype or Scene), and the breadcrumb reads something like "Whiteboard: Lunch checkout flow". When you close it, the item disappears again. Clicking Blueprint itself always takes you back to the canvas. If you rename a whiteboard, the navigation and the breadcrumb follow straight away.
Links that can't open
If the object behind a link has been deleted, or you don't have access to it, you see "This prototype couldn't be opened. It may have been deleted, or you don't have access." and land on the canvas. Links point into one workspace, so a link from another company you belong to says the same until you switch to that company. A short ID link such as /app/blueprint/id/SH12 or /app/blueprint/id/D21 opens the object too.
Prototypes and scenes
A preview runs in a secure, sandboxed frame: it can run its own pages and forms, but it can't reach your RoleDream session, open pop-ups or navigate away. Reload starts it over, and Open in new tab opens it full-screen in a new browser tab. A preview link lasts a limited time: a notice warns you a minute before it runs out, and it never reloads by itself, because reloading resets whatever you did in it. A slow preview offers Open in new tab, and a scene whose simulation isn't set up yet says so instead of showing a blank frame. Delete in the header removes the prototype or scene for good, after you confirm.
Copy Link, Share and Public Links
There are three ways to hand an object to someone, depending on who they are: a teammate who already has access, someone who should join the workspace, or someone outside it who only needs to try a prototype or scene.
| Use | For | What the person gets |
|---|---|---|
| Copy link | People already in the workspace | The object's address. Opening it lands on the object |
| Share | People who should join the workspace | Access to the whole workspace, landing on the object |
| Public links | Anyone, without an account (prototypes and scenes only) | The preview only, with no sign-in and no workspace access |
Copy link
Copy link sits in the header of the whiteboard editor and of the preview, in every box's menu and in the work list. It copies the object's clean address, without your current zoom or search, and a notification confirms it. Copying works in view-only mode too.
Share
The Blueprint's Share button stays in the page header while an object is open. On an object, the Share modal is titled Share link to this whiteboard (or prototype, or scene). Pick the role and expiry for people who join, then Create & copy link. The modal spells out what joining grants: "People who join get view access to the whole workspace and land on this prototype." Only workspace admins can create join links. Everyone else is told so and offered Copy link instead.
public Public links for prototypes and scenes
- Found under Public links in the Share modal of an open prototype or scene. Whiteboards have no public links; share them with Copy link or a join link
- Anyone with a public link can open that preview without signing in. It gives no access to the workspace
- Add an optional label ("Who is this link for?") and an optional expiry date, today or later. The new link is shown once, so copy it right away
- The list shows every public link to the object, labelled and dated, as Active, Expired or Revoked, including links an AI assistant created. Revoke asks first and stops the link for good
- Public links depend on your plan. On the Free plan, creating one shows an upgrade message, with View plans if you can change billing
- The Public links section is shown to anyone whose role lets them manage this prototype's or scene's public links (including links an assistant created), whether or not they can create join links
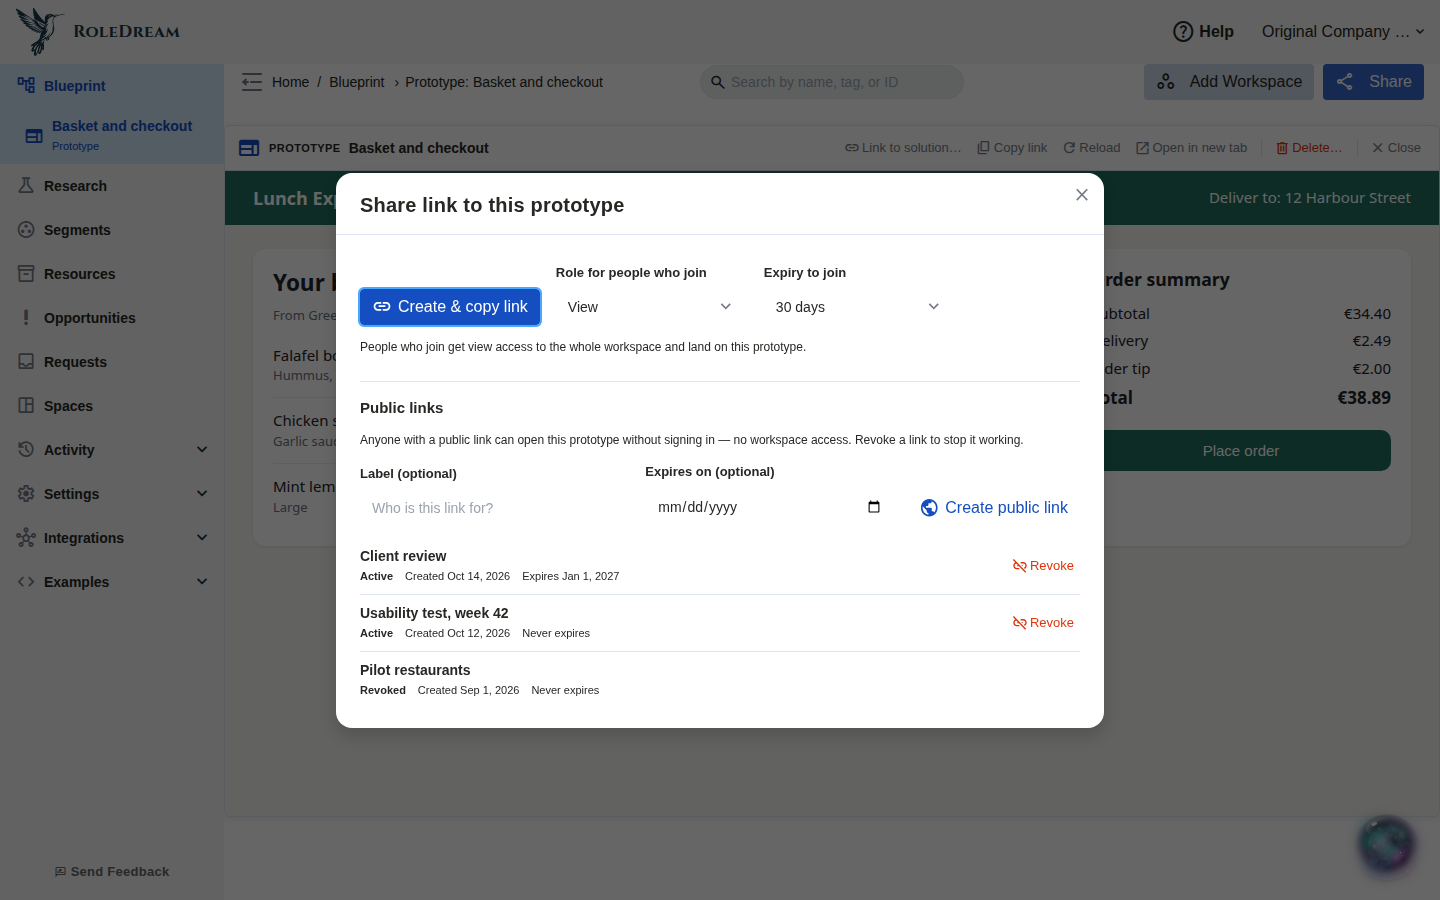
Share on an open prototype: a join link for the workspace on top, public links for the preview below. (Click to zoom)
Sketch Next to the Work
A whiteboard is a free drawing board for boxes, sticky notes, text, connectors and pen strokes. Rename, copy a link to, or delete a whiteboard from its box menu.
- Add one with Add whiteboard in the canvas area, by right-clicking empty space there, or with New whiteboard inside the editor. New whiteboards are numbered: Whiteboard 1, Whiteboard 2, and so on
- Click its box to open it. The editor's header holds the name (click the arrows beside it to switch to another whiteboard), the linked solutions and the save state, then Link to solution…, Copy link, Delete and Close
- Link to solution… links the whiteboard to solutions. Each linked solution shows as a chip: click it to go there, or click its crossed-link icon to unlink it. A prototype or scene's header has the same Link to solution…
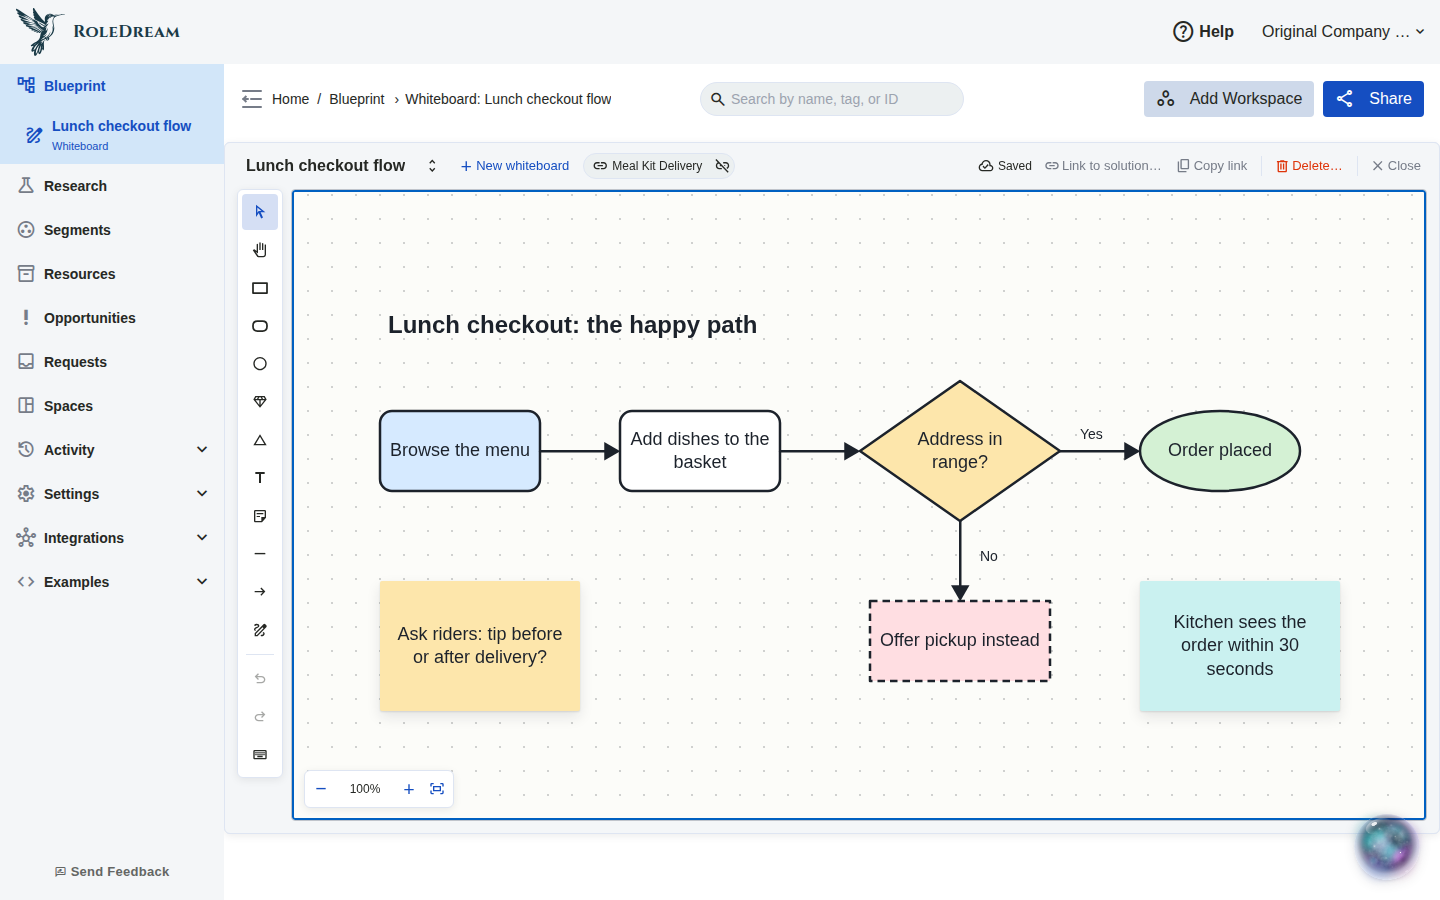
The whiteboard editor: tools on the left, the board in the middle, and the name, links and save state on top. (Click to zoom)
Drawing Shapes
Choose a tool from the left rail (or press its key), then click the board for a shape of the default size or drag to size it yourself. The rail offers rectangles with sharp or rounded corners, ellipses, diamonds, triangles, text, sticky notes, lines, arrows and a pen. Hold Shift for a square, a circle or a 45° line, and Alt to draw from the centre. After one shape the tool switches back to Select; double-click a tool to keep it.
Text in every shape
Text and sticky notes are ready for typing as soon as you place them. To add or change the text of any box, double-click it, or select it and press Enter. Enter starts a new line, and Esc or a click elsewhere finishes. Boxes grow to fit their text, and free text widens to fit its words until you give it a width.
Select, move, resize
Click to select a shape, Shift+click to add another, or drag across empty board to select everything you touch. Drag to move and pull the handles to resize. The arrow keys nudge by 1, or by 10 with Shift. Right-click empty board to add a shape where you clicked.
The Style Bar
Select one or more shapes and the style bar appears just above them. It only offers the controls that suit everything you selected, and one change restyles the whole selection as a single step to undo.
| Control | What it changes |
|---|---|
| Fill | The shape's colour: one of ten, or no fill |
| Stroke | The outline or line colour, its weight (thin, medium, thick), solid or dashed |
| Text size, Bold, Alignment | Small to extra large text, bold, and left, centred or right alignment |
| Rounded corners | Rectangles only: sharp or rounded corners |
| Arrowheads, Elbow connector | Lines only: no arrowhead, one at the end, or both; a straight or right-angled route |
| Arrange | Exact X, Y, width and height, and the layer order (to front, forward, backward, to back) |
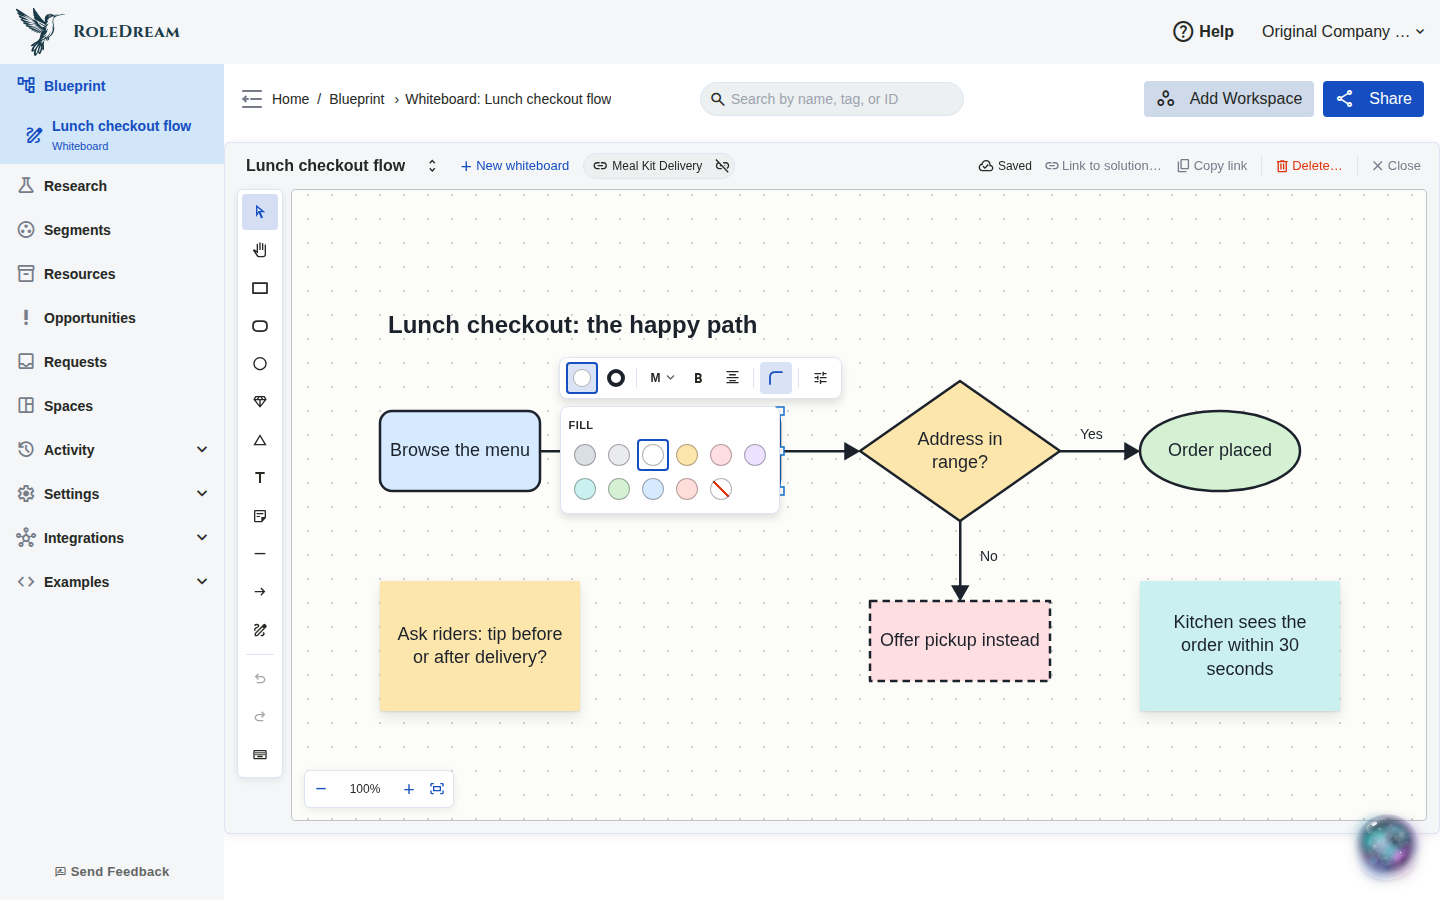
The style bar above a selection, with the fill palette open. (Click to zoom)
From the keyboard: Alt+F10 jumps to the style bar, the arrow keys move between its controls, Enter opens a palette, and Esc returns to the board. Every colour has a name, so a screen reader announces "Fill: Amber".
Connectors That Stay Attached
Draw a line or an arrow from one box to another and both ends attach. While you drag over a box, it is outlined and shows five dots. Let go near a dot to attach there, on the edge to attach at that point, or anywhere inside to attach to the centre. When you later move or resize the box, the connector follows. Hold Alt to drop an end without attaching it.
- Drag a connector's end onto another box to re-attach it, or onto empty board to free it
- Dragging a connector on its own detaches it; moving it together with its boxes keeps it attached
- Deleting a box leaves its connectors in place, detached, and undo puts everything back
- Turn on Elbow connector in the style bar for a right-angled route, then drag the small diamond on its middle segment to move the bend
Attaching an arrow: the target is outlined and shows where the end will land. (Click to zoom)
Aligning, Copying and Undo
Smart guides
When you move or resize a shape, its edges and centre snap to the shapes around it, and a guide line shows what it lines up with. Hold Alt to place it freely. For exact placement, type the numbers into the style bar's Arrange panel instead of dragging.
Copy, paste and duplicate
Copy, cut and paste work with the usual keys, from one whiteboard to another too, and connected shapes stay connected. Text copied from anywhere else is pasted as a text shape. Ctrl+D duplicates the selection slightly down and to the right.
Undo on the board
While the editor is open, Ctrl+Z undoes your board changes one step at a time and Ctrl+Shift+Z redoes them. A step that someone else has changed since is skipped, never forced back. If you reopen a whiteboard, its undo history is still there until you leave the page.
Saving
Every change saves by itself, and the header says Saved. If a change can't be saved, the header says Not saved and offers Retry, your drawing stays as you left it, and the editor asks before you leave, whether you close it, click away or press the browser's Back.
Keyboard Shortcuts
Press ? in the editor for the full list. On a Mac, use ⌘ wherever it says Ctrl.
| V H R O D T S | Select, hand, rectangle, ellipse, diamond, text, sticky note |
| L A P · Q | Line, arrow, pen · keep the current tool |
| Tab / Shift+Tab | Select the next / previous shape (announced as "3 of 12") |
| Ctrl+C / X / V / D | Copy, cut, paste, duplicate |
| Ctrl+] / [, with Shift | Bring forward / send backward; with Shift, to the front / back |
| Alt+F10 · Shift+F10 | Go to the style bar · open the board menu |
| Shift+1 · Shift+0 · Space+drag | Fit to content · 100% · pan |
| Esc | Step back: finish editing text, clear the selection, then close the whiteboard |
Limits and Deleting
A whiteboard holds up to 2,000 shapes, and a workspace up to 200 whiteboards. Past either limit, the new shape or whiteboard isn't created and you're told why. Deleting a whiteboard always asks first. If it is small enough, the notification that follows has an Undo that brings it back with its drawing; a very large whiteboard warns you beforehand that the delete can't be undone. Prototypes and scenes can't be renamed. You can delete one from its box menu or its header, if your role allows it: it asks first, and a deleted prototype or scene can't be restored.
View-Only Mode, Keyboard and Screen Readers
View only
Viewers, and anyone on a phone-sized screen, can open every object, copy its link and go to its linked solutions, but can't add, link, unlink, rename, delete or move boxes. The open object shows a View only chip in its header. A whiteboard opens read-only: you can pan, zoom, select and step through shapes with Tab, without the tools or the style bar, and a note under the header says why.
The work list
Everything a box does is also available from a keyboard-friendly list grouped into Whiteboards, Prototypes and Scenes, reached with the area's Skip to the work list link. A row reads like "Prototype 'Basket and checkout', 1 of 2. Linked to: Meal Kit Delivery." and offers Open, Go to, linking, Copy link, and Move left / up / right / down to arrange boxes without a mouse.
Keyboard in a preview
When a prototype or scene opens, focus starts on Close. When you Tab into the preview, a reminder strip above it reads: "Press Shift+Tab to return to the header" (screen readers hear it with the preview). While you work inside the preview, Esc belongs to the preview; press it from the header to close.
Announcements
Opening a whiteboard announces its name and how many shapes it has. Tools, selections, moves, style changes, undo and redo are announced as they happen, and the navigation item for an open object carries its full name, for example "Whiteboard: Lunch checkout flow".