
Resources
The tools, artifacts, and documents people actually use — and everything that depends on them
Resources Are the Means
A resource is anything people reach for to get a job done: a system, an app, a form, a template, a guide, a piece of equipment. Jobs describe what someone is trying to achieve and solutions describe how; resources are what they use while doing it.
Keeping them in the model pays off in one specific way: you can ask the reverse question. Not just "what does this process use?" but "which jobs and solutions depend on this tool?" — the question that matters when a system is being replaced, a licence is up for renewal, or a document is about to be rewritten.
How resources sit in the wider model is explained in Core Concepts — this page is about working with them.
What the form doesn't tell you
- The name travels. It appears on staged chips across the Blueprint and in search, so short and recognisable beats descriptive — "Dispatch console", not "The console used by dispatchers".
- The type sets the icon you see everywhere the resource appears. Nine come as standard — tool, system, service, document, artifact, equipment, building, room and object — and administrators can add, rename or retire types in Object Types to match what your organisation actually calls things.
- Tags are searchable from the Blueprint, not only from the Resources pages — so a label like "third-party" or "to retire" lights up the canvas, not just a filter list.
Two Places, Two Jobs
Resources are worked on in two places, and the division is clean. If you are looking for something and can't find it, this is almost always why.
Resources pages — the library
Everything about a resource as a record lives here: creating and editing, describing and tagging, attaching files and links, breaking it into sub-resources, ordering and re-nesting that hierarchy, and deleting.
Resources in the main menu, then a resource to open its own page.
Blueprint — the connection to work
Saying which step uses which resource happens on the canvas, by staging a resource into a step's Frontstage or Backstage lane. That single link is what makes a resource show up against a solution and a job.
Blueprint in the main menu, then a job to open its solutions.
The picker on the Blueprint can also create, edit, and delete resources on the spot — sub-resources and attachments included — so you are never forced to leave the canvas mid-thought. It is a shortcut into the same records, not a second library.
Working on the Resources Pages
Resources in the main menu lists your top-level resources, with filters for type and tags. Opening one gives it a page of its own: its details, an Associations summary of what points at it, and the tree of everything nested underneath. That tree is where most of the work happens — every row can be added to, edited, deleted, reordered, and re-nested in place, so a whole hierarchy is built without leaving the page.
What each one is used by
Rows carry badges for the solutions and other records linked to them, so the dependencies of a whole subtree read at a glance rather than one page at a time.
Attachments in place
A row shows thumbnails of its images alongside its files and links. Click one to open the image, download the file, or follow the link without opening the resource first.
Order is meaning, so it works from the keyboard
The order of sub-resources is yours and it is saved. Every control in the tree is a real button you can tab to, focus stays on the row you are moving so repeated presses are cheap, and each change is announced.
Moving a Resource
Indent and outdent on a row rearrange it inside the tree you are looking at. To move a resource somewhere else entirely — under a different top-level resource, or up to the top level itself — edit it and change Parent resource. The distinction matters because of what travels with it.
lightbulb Moving a resource can move its solution links
A resource's connection to the solutions that use it is held at the top of its hierarchy. So a move that changes which top-level resource it belongs to also moves those solution links: nest a top-level resource under another and its links follow the new top-level parent; promote a sub-resource and it gets its own links to the solutions it is used in. Moving a row within the same tree changes nothing.
You don't have to work this out yourself. The edit form says what will move before you save, and once the move has gone through the app reports what actually changed — including the honest "not updated yet, check again in a moment" when the change is still catching up.
Deleting a Resource
Deleting is the one action here with consequences you can't see from where you're standing — a resource can be staged under steps on the far side of the Blueprint. So the confirmation tells you the blast radius first.
What the Confirmation Tells You
- account_treeHow much goes. Deleting cascades: the resource and everything nested under it go together. Sub-resources are not promoted to the top level — the count is in the first sentence so it is never a surprise afterwards.
- layersHow many solution steps it is staged under on the Blueprint, and which solutions are affected, by name (the first few, then "+n more") — so you can recognise the flow you are about to change.
- linkHow many other links to jobs, segments, research, and requests go with it, and how many attachments.
Confirming stays disabled for the moment it takes to check. If the check itself fails the dialog says so plainly and lets you go ahead anyway — a diagnostic that couldn't run is no reason to block the action.
undo What Undo does, and what it does not
For about ten seconds after a delete, the message at the top of the screen carries an Undo button. Undo brings the resources themselves back — it does not restore their links, their staging, or their attachments. A restored resource comes back empty of connections, and re-staging it is on you.
A restored resource is also a new record with a new address. Any link to the old one — a bookmark, a URL in a message — stays dead even after a successful undo. If a resource is shared by link and you are not certain about deleting it, edit it instead.
Missing the ten seconds is not final: the same delete can be reverted later from Activity → Audit Log.
Connecting Resources to Work: Frontstage & Backstage
Select a job on the Blueprint and its solutions open in place. Beneath the steps of the active solution sit two staging lanes — Frontstage (what the customer sees) and Backstage (the work behind it) — divided into one slot per step. Putting a resource in a slot is how you record that this step uses this tool, and the dashed line of visibility between the lanes is the classic service-blueprint boundary.
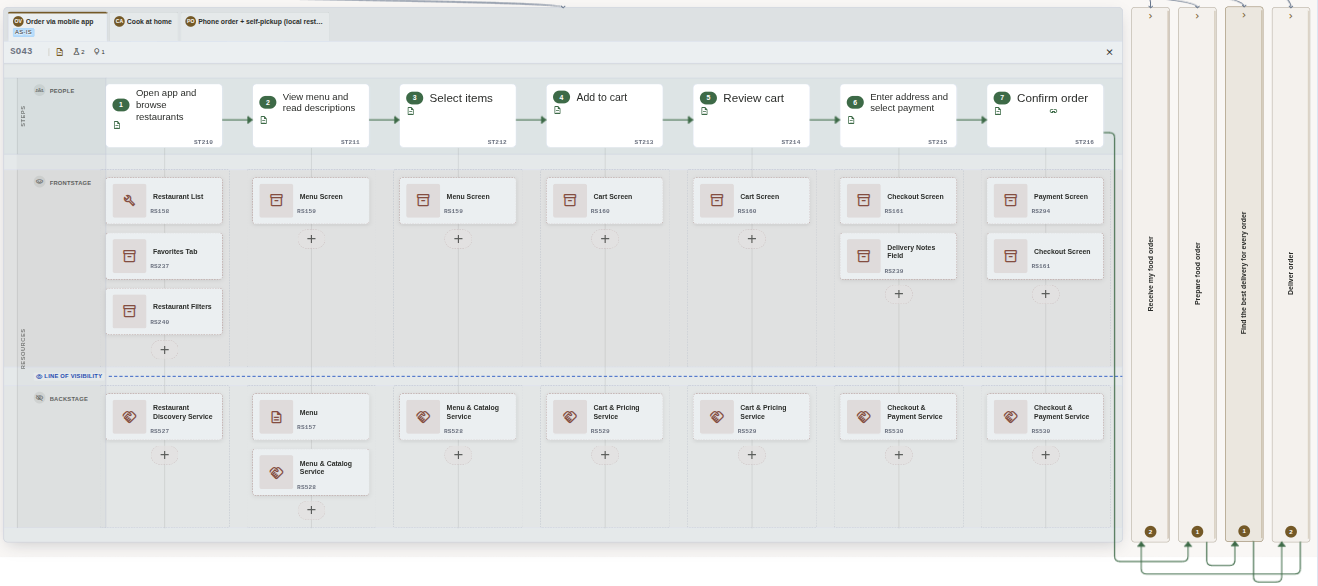
Resources staged under the steps that use them, in the lane that matches whether the customer sees them. (Click to zoom)
Staging from a slot
A slot's "+" opens the picker for that step and lane, and every tick applies immediately — there is no separate save. Ticking a resource already staged in the step's other lane moves it rather than adding a second copy, and one resource can be staged under as many steps as you like.
Flip, move, or unstage
Drag a staged chip to the other lane to flip it, or to another step's slot to move it; a toggle on the chip flips it without dragging. Its ✕ takes the resource off that step — which unstages it, and never deletes it.
A staged chip carries its own contents: a thumbnail of its first image and small counts of its images, files, and links. Click the thumbnail for a quick-look — images full-size with zoom and next/previous, files downloading in a click, links opening in a new tab — with an Edit button in its footer.
Staging without a mouse
The Blueprint's keyboard outline gives every step a "Stage resource" control and every resource a "Stage under step" control, with flip, move, and unstage as ordinary buttons. Lane labels and position — never colour alone — tell Frontstage from Backstage.
Seeing What Depends on a Resource
Because a step link is a real connection rather than a note, it reads from both ends. Stage a resource once, and the solution using it and the job above that both know about it — nobody maintains a second list.
Job → resources
Open a job on the Blueprint and read what each step of each solution actually depends on, split by the line of visibility.
Resource → work
Open a resource and its Associations show the solutions it is used in, plus anything else linked to it. On the resource's page that panel is a read-only view of connections made elsewhere.
Questions this answers
- - Impact: what breaks if we retire this system?
- - Criticality: which tools does almost everything run through?
- - Waste: which resources nothing depends on any more?
- - Fragmentation: which single step needs five different tools to get through it?
route Building Your Resource Picture
Start from the work, not from an inventory
Map a solution's steps first, then add the resources each step actually needs. An inventory built in the abstract fills up with things nobody uses.
Break big things down
A whole platform is rarely the right unit. Give it sub-resources for the parts people actually touch, so a step can point at the exact screen or template it relies on.
Stage it where it is used, with the real thing attached
That one link turns a list of tools into an answerable model — and attachments show up on the staged chips, so the canvas carries a screenshot of the screen or the actual form, not just names.
Then read it backwards
Open a resource you are thinking of replacing and look at what depends on it. That reverse view is the reason the mapping was worth doing.